Tuesday, February 26, 2013

Boxwood Wreath

I just love small boxwood wreaths.  I've seen several on Pinterest that are so cute.


So....I decided I wanted one and chose to make it myself.  I have several boxwoods growing in my yard and I've used them before in many things.  I gathered my needlenose pliers, thin green wire, boxwood of course, and a small wire wreath frame.  I made my frame from heavy duty wire and it worked great.

 I held a thin boxwood branch and wrapped wire around it as I held it to the form.  It only took about 30 minutes  to make the entire wreath.
Here's how mine turned out with a pretty cream colored ribbon.  I think I'll put it on one of my bookcase or maybe hang it on a door knob.  What do you think?


Try one for yourself.  It isn't hard but so rewarding.  

I'm Linking to      :

Saturday, February 23, 2013

Birthday Party

Today is my niece's 11th birthday and I am hosting her party here at my house.  My family usually has each of our birthday parties at my mother's house, but she is having her hardwood floors refinished and I volunteered to have her party here. My niece is Mary Catherine and her favorite color is blue.  
This is my niece, the birthday girl.  Isn't she cute?  She rides horses and these are some awards she won.
I decided that since it's been so cold here I wanted to bring in a little spring by using yellow to brighten up the blue.


I chose butterflies and pinwheels as my theme.  For the tablecloth, I bought a piece of fabric that has a bit of a shine and used 3 yards.  Sometimes is to your advantage to just buy fabric to get exactly what you want. It isn't very expensive if you watch you spend.  Yes, I love polka dots.


I love the reflection of the light on the ceiling.  Even our little statue got in on the action.  lol.  I Hope you enjoyed this tablescape and that I brought Spring in a little early.


Thursday, February 21, 2013

Restored Buffet

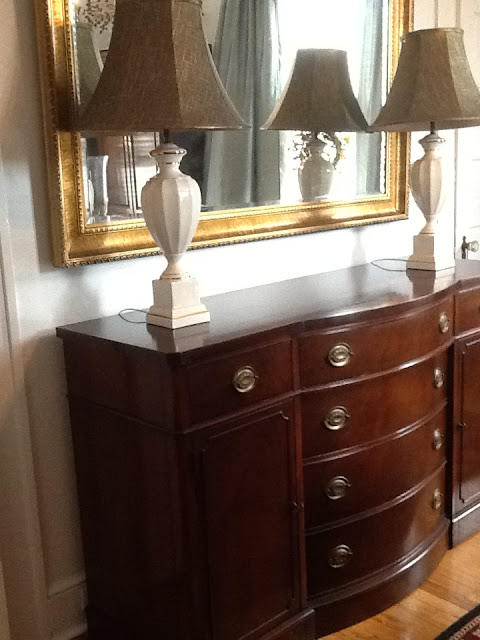
Hello everyone!  I recently purchased a 1949 Drexel Buffet at a local antique store.  It is so well made, has a beautiful curved front and I really love it....but it did have a few scratches.
This photo is a bit blurry, but shows some of the scratches on it.  This is along the bottom, but it also had scratches on the top, drawers and sides.  The antique dealer recommended I use a product called Restore-A-Finish by Howard.  They sold it there at the store and I've seen it at other shops so I bought a bottle to give it a try.  Most of you have probably heard of this product, but it is new to me.  Let me tell you, it is my new best friend.
All you have to do is pour on a cloth or use oooo steel wool and rub in the direction of the wood grain.  I liked using the Dark Walnut because I felt this would match most of the wood colors I have.  Then, dry with a soft, clean cloth.  That's it.  Look at the difference.

 It turned out beautiful.  I left the original brass pulls which have nice detail and petina.    Now that I have a new piece of furniture, I guess I'll just have to continue shopping for something to put in between my lamps.   I love any excuse to do more antiquing.   lol

I'm Linking To:

FFF  

Tuesday, February 19, 2013

Clowns

I love finding art in unusual places.  These paintings I picked up several years ago at a Goodwill store and thought they were beautiful.  I haven't framed them, nor found a place to use them yet, but they are adorable.

I'm not sure who the artist is.   Can any of you make out the name? Maybe Stabile?   I'd love to research to find out more information.  They are rich in color, very detailed and I LOVE them.  I have a cousin who used to love and collect clowns and I thought of her when I got these. 

I believe this one is my favorite.


Aren't clowns fun?

Sunday, February 17, 2013

Twig Lights

So, I have been frantically trying to get some finished touches done to my guest bedroom.  I am going for a shabby chic look for this room, something girly.  My mother is coming to stay with us for about a week while her hardwood floors are being refinished and she can't stay in her house during this process.

One of the things in the room that I have not be able to get to is the light over the center of the bed.  I want to find just the right little light and the one that is there is too plain and modern for my taste.
 A few months back I was shopping in a quaint little gardening shop and saw a beautiful chandelier covered with twigs.  That was what I was going to do.  Cover this awful light with twigs.

I have a bush in my yard called Elaeagnus, that gets long shoots which would be perfect to cut and use.  They are a nice brown color.
The shoots can come off as long as 6 feet and are very pliable.  It makes it perfect for all kinds of projects.

I know they look prickly, but they are very soft.  I brought them inside the kitchen to strip the large leaves off, (it was freezing outside).  It made a grand mess as you can see, but the finished result was worth the mess.


I still have a few more twigs to add to completely cover the light, but couldn't wait to share it with you.  Here is what it looks like over the bed.


Here are some other ideas of twigs used over lights that I found on google.  Aren't they neat?
Design Squish.com
Flickr.com
Blue Zeppelin.com
I've seen the twigs painted in all colors and they are a unique way to add interest to an otherwise boring light.  Just use wire to affix them and I recommend using LED lights that do not get hot, or keep the twigs away from the bulb itself.  Happy twigging.  

I'm linking to:    Funky_Junk's_Party_Junk_link_party_150   

Thursday, February 14, 2013

Valentines Day

I love Valentines Day.  I love to give sweet little things and I love to get little prizes.  It's a day my boys and my husband go the extra mile to show me how much they love me.  My husband cooks dinner and I set the table.  Love getting that chocolate candy.
Here is a photo of my table for tonight.  I love using black and white with red and I wrote little notes on the cards at the plates.  Shrimp and grits are on the menu and Cupid is ready to shoot his arrows.


My youngest son gave me these pretty pink roses.  Aren't they pretty?
Remember, today we say I Love You to everyone we can.  Have a Happy Valentines Day!  

Wednesday, February 13, 2013

Kitchen Lamp

Ok, sometimes I admit that I get lucky.  I'm out thrifting,  looking for something specific, and find just what I had been searching for.  I've been looking a while for just the perfect little lamp for my kitchen and voila!, there it is in front of me in my favorite home consignment store.


Aren't the color's just perfect with the painting?

 You can make your own crackle finish on just about anything.  It is easy and pretty inexpensive.  All you need are two colors of acrylic paint,a  couple of foam paint brushes and Elmers glue.

1.  Paint whatever you are working on the first color of paint.  (I prefer a darker color here).  Let dry.
2.  Paint in long strokes the Elmers glue (pretty thick) on top of this.   You can water this down to get a smaller crackle like on my lampshade.  If you like a large crackle, don’t water down at all.
3.  When almost dry, tacky to the touch, paint on your top coat (you can water this paint down as well to get whatever effect you want) and watch the magic.  Let dry.

That’s it.  Pretty easy huh?  Practice on a scrap piece before you begin your project to make sure you have the look you are going for.

Below are a few photos I found on Quakerrose.com of a crackle finished bed, and a small plaque.  Aren’t they pretty?


I have also painted my own diamonds and bands on several things.  I like to use a metallic paint found at Hobby Lobby.  Tape off where you may want a band and paint this first, let dry completely or when you paint the diamonds it will peel off, then tape your diamonds using painters tape.  That's it.  Simple to turn a plain lampshade into something really cute, or you can be lucky like me and find one already painted.  lol